AWS Lightsail Java Server Setup Memo
This is a journal of my setup for a Java server on AWS, Lightsail in particular for my Sump Water Level Application project.
Applications
- OS: Amazon Linux 2023
- Reverse Proxy: Nginx
- Application: Spring Boot jar - as Java server
- DB: MySQL
- Cache: Redis
- Streamlit - Presentation of the Sump Water Level data
Why Lightsail
Because this server is for a purpose of showcasing the Spring Boot application, the load is very light, almost nil. One VPS suffices hosting Nginx, MySQL and Redis. For a real-world application, with somewhat mild workload, I’d use separate AWS services, such as RDS for MySQL and ElastiCache for Redis.
Setup Steps
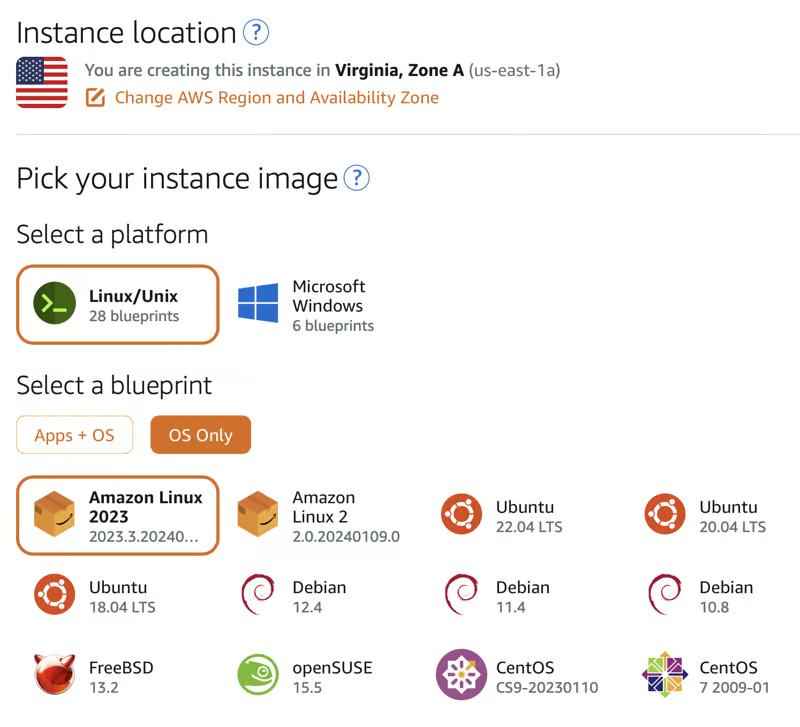
1. Select Amazon Linux 2023 from the “Create Instance” page.
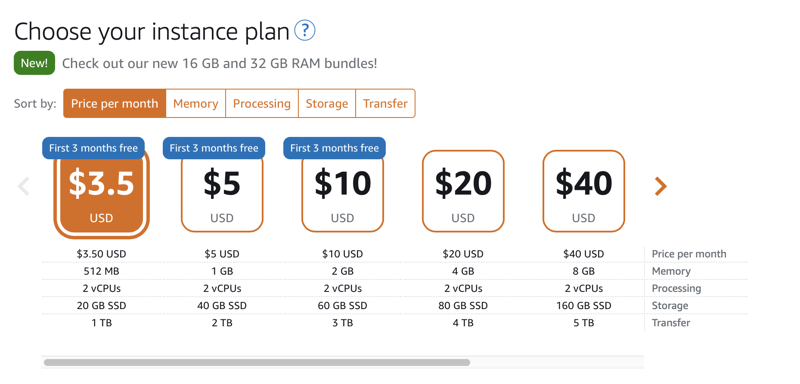
I didn’t choose Nginx instance because it’s a Bitnami package with PHP, Memcache, and other frills I don’t need. I chose 1GB RAM plan ($5/mo) to start with. Since it’ll connect with just 1 Raspberry Pi and the Web UI will be basically only for 1 user (me), this should be sufficient.
Note: Below in screenshot, I started with 512MB instance. But I moved it to 1GB instance.
In moving the instance from 512MB to 1G, I created a snapshot of 512MB instance, and created a new instance from it. Somehow, the new instance doesn’t have a swap file (probably because the memory size is different), I created it manually.
 dd if=/dev/zero of=/swapfile bs=1M count=1024
 chmod 600 /swapfile
 mkswap /swapfile
 swapon /swapfile
 swapon -s
 free
Then, edited /etc/fstab and added the line on the bottom so that swap file will be used after reboot.
/swapfile swap swap defaults 0 0
2. Set up the basics
- Attach Static IP
- Add SSH public key from my laptop
- Give a host name to the IP locally (/etc/hosts) - I named it
sumpserver.$ ssh ec2-user@sumpserver The authenticity of host 'sumpserver (xx.xx.xx.xx)' can't be established. ED25519 key fingerprint is SHA256:abdcABCD1234... Are you sure you want to continue connecting (yes/no/[fingerprint])? yes Warning: Permanently added 'sumpserver' (ED25519) to the list of known hosts. , #_ ~\_ ####_ Amazon Linux 2023 ~~ \_#####\ ~~ \###| ~~ \#/ ___ https://aws.amazon.com/linux/amazon-linux-2023 ~~ V~' '-> ~~~ / ~~._. _/ _/ _/ _/m/' [ec2-user@ip-xx-xx-xx-xxx ~] - Set the time zone. Add below in
.bash_profileTZ='America/New_York'; export TZ - Edit prompt
export PS1='\[\e[1;106m\]\u \W\[\e[m\] $ '
3. Install MySQL
sudo su
dnf upgrade
dnf localinstall -y https://dev.mysql.com/get/mysql80-community-release-el9-1.noarch.rpm
dnf install -y mysql mysql-server mysql-community-client
systemctl start mysqld.service
systemctl status mysqld.service
systemctl enable mysqld.service
Check root temporary password
grep 'temporary password' /var/log/mysqld.log
Login to MySQL
mysql -u root -p
Create user and database
ALTER USER 'root'@'localhost' IDENTIFIED BY '<myrootpassword_here>';
CREATE USER 'sumpadmin'@'%' identified by '<sumpserver_user_password>';
CREATE DATABASE sumpdata;
GRANT ALL PRIVILEGES ON sumpdata.* TO 'sumpadmin'@'%';
4. Install Nginx
Installation of Nginx itself is straightforward.
sudo su
dnf -y update
dnf list --available nginx
dnf -y install nginx
nginx -v
systemctl start nginx.service
systemctl status nginx.service
systemctl enable nginx.service
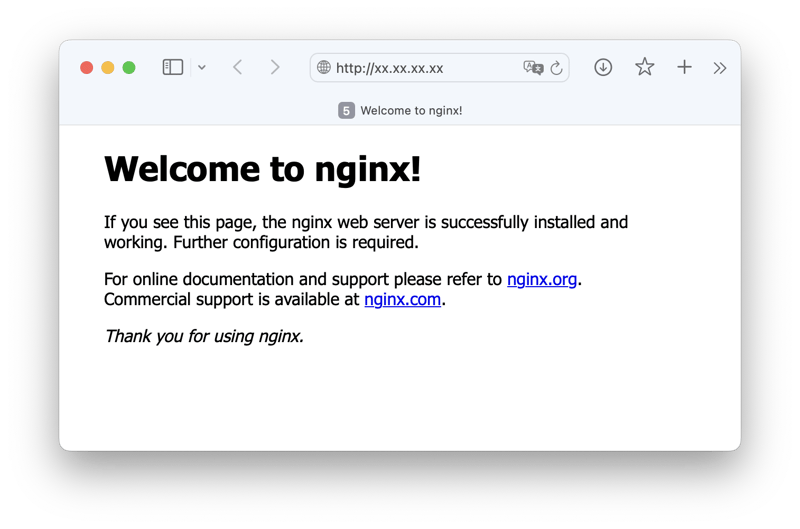
curl http://localhost
Point your browser to the public IP to check it’s accessible from the internet.
Let’s Encrypt Certificate
At this point, it only supports non-secure HTTP only. For HTTPS, I did the following.
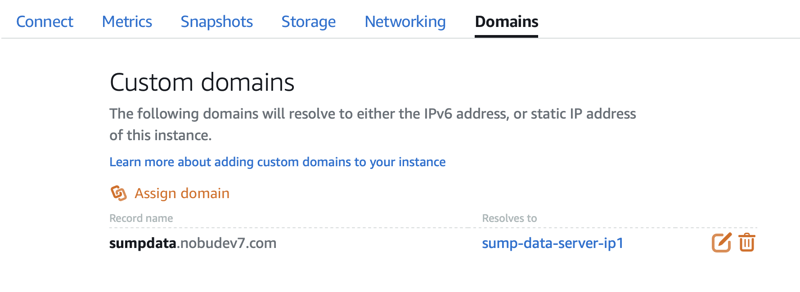
Obtain a domain and associate with AWS IP.
Install Certbot Certbot is a CLI that helps to obtain and maintain Let’s Encrypt cert.
sudo su
dnf install certbot python3-certbot-nginx -y
certbot --version
Before asking the certbot to obtain a SSL cert, configure Nginx server setting for the domain, so that certbot can edit the config for the matching domain.
/etc/nginx/conf.d/sumpdata.conf
server {
    listen       80;
    listen  [::]:80;
    server_name  sumpdata.nobudev7.com;


    location / {
        root   /usr/share/nginx/html;
        index  index.html index.htm;
    }
}
# Test the conf file
nginx -t
# Reload the conf
nginx -s reload
Run Certbot
Now, run certbot to obtain an SSL cert for the domain.
certbot --nginx -d sumpdata.nobudev7.com
After successfully obtained and installed the cert to Nginx configuration, the above created sumpdata.conf was edited by Certbot as follows.
server {
    server_name  sumpdata.nobudev7.com;


    location / {
        root   /usr/share/nginx/html;
        index  index.html index.htm;
    }

    listen [::]:443 ssl ipv6only=on; # managed by Certbot
    listen 443 ssl; # managed by Certbot
    ssl_certificate /etc/letsencrypt/live/sumpdata.nobudev7.com/fullchain.pem; # managed by Certbot
    ssl_certificate_key /etc/letsencrypt/live/sumpdata.nobudev7.com/privkey.pem; # managed by Certbot
    include /etc/letsencrypt/options-ssl-nginx.conf; # managed by Certbot
    ssl_dhparam /etc/letsencrypt/ssl-dhparams.pem; # managed by Certbot

}
server {
    if ($host = sumpdata.nobudev7.com) {
        return 301 https://$host$request_uri;
    } # managed by Certbot


    listen       80;
    listen  [::]:80;
    server_name  sumpdata.nobudev7.com;
    return 404; # managed by Certbot


}
Notice that Certbot made non-secure HTTP (port 80) to automatically redirect to HTTPS.
Configure Auto Renew
During the above process, certbot output the following.
Certbot has set up a scheduled task to automatically renew this certificate in the background.
However, checking timers revealed that nothing is set up for certbot.
systemctl list-timers
After reading various posts, I figured that certbot timer name is certbot-renew.timer not certbot.timer as widely referenced. Even Certbot itself might have a bug in setting the timer. Below, I set up the timer manually.
# Where is the certbot timer and service?
ls /lib/systemd/system/certbot*
/lib/systemd/system/certbot-renew.service
/lib/systemd/system/certbot-renew.timer
Try to see if the service works, and check the status.
systemctl start certbot-renew.service
systemctl status certbot-renew.service
Output
○ certbot-renew.service - This service automatically renews any certbot certificates found
     Loaded: loaded (/usr/lib/systemd/system/certbot-renew.service; static)
     Active: inactive (dead) since Mon 2024-01-15 12:57:33 EST; 31s ago
TriggeredBy: ○ certbot-renew.timer
    Process: 69039 ExecStart=/usr/bin/certbot renew --noninteractive --no-random-sleep-on-renew $PRE_HOOK $POST_HOOK $RENEW_HOOK $DEPLOY_HOOK $CERTBOT_ARGS (code=exited, status=0/SUCCESS)
   Main PID: 69039 (code=exited, status=0/SUCCESS)
        CPU: 500ms

Jan 15 12:57:33 ip-xx-xx-xx-xx.ec2.internal certbot[69039]: Processing /etc/letsencrypt/renewal/sumpdata.nobudev7.com.conf
Jan 15 12:57:33 ip-xx-xx-xx-xx.ec2.internal certbot[69039]: - - - - - - - - - - - - - - - - - - - - - - - - - - - - - - - - - - - - - - - -
Jan 15 12:57:33 ip-xx-xx-xx-xx.ec2.internal certbot[69039]: Certificate not yet due for renewal
Jan 15 12:57:33 ip-xx-xx-xx-xx.ec2.internal certbot[69039]: - - - - - - - - - - - - - - - - - - - - - - - - - - - - - - - - - - - - - - - -
Jan 15 12:57:33 ip-xx-xx-xx-xx.ec2.internal certbot[69039]: The following certificates are not due for renewal yet:
Jan 15 12:57:33 ip-xx-xx-xx-xx.ec2.internal certbot[69039]:   /etc/letsencrypt/live/sumpdata.nobudev7.com/fullchain.pem expires on 2024-04-14 (skipped)
Jan 15 12:57:33 ip-xx-xx-xx-xx.ec2.internal certbot[69039]: No renewals were attempted.
Jan 15 12:57:33 ip-xx-xx-xx-xx.ec2.internal certbot[69039]: - - - - - - - - - - - - - - - - - - - - - - - - - - - - - - - - - - - - - - - -
Jan 15 12:57:33 ip-xx-xx-xx-xx.ec2.internal systemd[1]: certbot-renew.service: Deactivated successfully.
Jan 15 12:57:33 ip-xx-xx-xx-xx.ec2.internal systemd[1]: Finished certbot-renew.service - This service automatically renews any certbot certificates found.
Start the timer
systemctl start certbot-renew.timer
# Check if it's scheduled.
systemctl list-timers certbot-renew.timer
# OUTPUT
NEXT                        LEFT     LAST PASSED UNIT                ACTIVATES
Tue 2024-01-16 06:58:43 EST 16h left -    -      certbot-renew.timer certbot-renew.service
Note: Amazon Linux 2023 doesn’t come with crontab.
5. Install Git
sudo su
dnf install git -y
# exit to ec2-user
exit
git --version
6. Install Redis
dnf list --available |grep redis
# OUTPUT
redis6.x86_64         6.2.13-1.amzn2023.0.1    amazonlinux
redis6-devel.x86_64   6.2.13-1.amzn2023.0.1    amazonlinux
redis6-doc.noarch     6.2.13-1.amzn2023.0.1    amazonlinux

dnf install redis6 -y
systemctl start redis6
systemctl status redis6
systemctl enable redis6
redis6-cli
# OUTPUT
127.0.0.1:6379>
7. Install Java (Runtime)
# Check Java availability
dnf list --available java-21-amazon-corretto
# Install
dnf install java-21-amazon-corretto -y
java --version
8. Deploy Jar file from Git
The Git Action (discussed in GitHub Actions for Jar file deployment) build a jar file from the Java project. While the intention is to download it manually, I put all commands in a shell script.
#!/bin/bash

# Remove files named sumpdata*.jar
rm -f sumpdata*.jar

latestjar=$(curl \
    -s https://api.github.com/repos/nobudev7/sumpdata/actions/artifacts \
    | jq -r '.artifacts | max_by(.created_at) | .archive_download_url'
)

echo "Downloading $latestjar..."

curl -L -o artifact.zip\
  -H "Accept: application/vnd.github+json" \
  -H "Authorization: Bearer <github_token>" \
  -H "X-GitHub-Api-Version: 2022-11-28" "$latestjar"

if [ $? -eq 0 ]; then
  unzip artifact.zip
  rm artifact.zip
else
  echo "Downloading Jar failed: $latestjar"
fi
9. Run Jar application
To test if the Jar application properly work, start it with proper variables. In my case, I have different MySQL user/pass than what’s in the application.properties file, I pass it via environment variables (can be Dxxx=yyy param as well).
SPRING_DATASOURCE_USERNAME=<mysql_user> SPRING_DATASOURCE_PASSWORD=s<mysql_pass> java -jar sumpdata-0.2.0.jar
Add an entry from the local instance for testing.
curl -X POST 'http://localhost:8080/devices/2/entries?measuredOn=2023-10-24T16:37:06&value=12.2' -H 'Content-Type: text/plain'
Check the MySQL table.
mysql> select * from data_entry;
+----------+----------------------------+-------+
| deviceid | measured_on                | value |
+----------+----------------------------+-------+
|        2 | 2023-10-24 16:37:06.000000 |   122 |
+----------+----------------------------+-------+
1 row in set (0.00 sec)
9. Run a Jar app as a service
It seems that the current way of setting up a service is to use systemctl edit <service_name>.
However, if you run it the first time, on Amazon Linux 2023, it shows an error and suggests --force option.
# systemctl edit sumpdata
No files found for sumpdata.service.
Run 'systemctl edit --force --full sumpdata.service' to create a new unit.
Running it as suggested, an editor (nano) shows up. This will become the service file.
[Unit]
Description=Sump Data service
After=syslog.target network.target

[Service]
SuccessExitStatus=143

User=ec2-user
Group=ec2-user

Type=simple

WorkingDirectory=/home/ec2-user/sumpdata
ExecStart=/usr/bin/java -jar sumpdata.jar
ExecStop=/bin/kill -15 $MAINPID

[Install]
WantedBy=multi-user.target
Save the file, but don’t change the file name, as the file name is temporary and the systemctl will properly move it to /etc/systemd/system.
Note that, the above service file doesn’t have any Environment values. That is to be written under override.conf, by systemctl edit <service_name>.
The same (nano) editor opens up, and between comment lines, add the env variables.
### Editing /etc/systemd/system/sumpdata.service.d/override.conf
### Anything between here and the comment below will become the new contents of the file

[Service]
Environment="SPRING_DATASOURCE_USERNAME=dbuser"
Environment="SPRING_DATASOURCE_PASSWORD=dbpassword"

### Lines below this comment will be discarded

### /etc/systemd/system/sumpdata.service
# [Unit]
# Description=Samp Data service
# After=syslog.target network.target
...
After saving the override, a conf file is created.
$ ll /etc/systemd/system/sumpdata.service.d
total 4
-rw-r--r--. 1 root root 125 Jan 20 10:36 override.conf
Register and start the service, and check status.
$ systemctl daemon-reload
$ systemctl start sumpdata.service
$ systemctl status sumpdata.service
● sumpdata.service - Samp Data service
     Loaded: loaded (/etc/systemd/system/sumpdata.service; disabled; preset: disabled)
    Drop-In: /etc/systemd/system/sumpdata.service.d
             └─override.conf
     Active: active (running) since Sat 2024-01-20 10:21:51 EST; 1s ago
   Main PID: 129986 (java)
      Tasks: 13 (limit: 1061)
     Memory: 69.9M
        CPU: 2.674s
     CGroup: /system.slice/sumpdata.service
             └─129986 /usr/bin/java -jar sumpdata.jar
Make the service start automatically.
$ systemctl enable sumpdata.service
Created symlink /etc/systemd/system/multi-user.target.wants/sumpdata.service → /etc/systemd/system/sumpdata.service.
After the service started, to see the jar output, use journalctl
$ sudo journalctl -u sumpdata.service
10. Install Streamlit and clone SumpChart
To set up the Streamlit application, first, clone SumpChart repo.
git clone https://github.com/ntamagawa/sumpchart.git
The SumpChart app will be run under a Python environment, so let’s create a virtual env for that.
python3 -m venv streamlitenv
cd sumpchart/
source ~/streamlitenv/bin/activate
pip3 -V
# Output
pip 21.3.1 from /home/ec2-user/streamlitenv/lib64/python3.9/site-packages/pip (python 3.9)

# Update pip
python3 -m pip install --upgrade pip

pip3 -V
# Output - now pip is the latest version
pip 23.3.2 from /home/ec2-user/streamlitenv/lib64/python3.9/site-packages/pip (python 3.9)
Using the pip3, install Streamlit and all dependencies per requirements.txt specifies.
pip3 install -r requirements.txt
Run the application as a test.
$ streamlit run sumpchartapp.py

Collecting usage statistics. To deactivate, set browser.gatherUsageStats to False.


  You can now view your Streamlit app in your browser.

  Network URL: http://172.xx.xx.xx:8501 # AWS internal network
  External URL: http://52.xx.xx.xx:8501 # External network
Note that, since the instance is an AWS server behind Lightsail default firewall, the port 8501 is not accessible at this point.
For testing purpose, connect via SSH from another terminal, and check to see at least the streamlit app is running.
$ curl http://172.xx.xx.xx.xx:8501
<!doctype html><html lang="en"><head><meta charset="UTF-8"/><meta name="viewport" content="width=device-width,initial-scale=1,shrink-to-fit=no"/><link rel="shortcut icon" href="./favicon.png"/><link rel="preload" href="./static/media/SourceSansPro-Regular.0d69e5ff5e92ac64a0c9.woff2" as="font" type="font/woff2" crossorigin><link rel="preload" href="./static/media/SourceSerifPro-SemiBold.5c1d378dd5990ef334ca.woff2" as="font" type="font/woff2" crossorigin><link rel="preload" href="./static/media/SourceSansPro-Bold.118dea98980e20a81ced.woff2" as="font" type="font/woff2" crossorigin><title>Streamlit</title><script>window.prerenderReady=!1</script><script defer="defer" src="./static/js/main.3afeb7b0.js"></script><link href="./static/css/main.77d1c464.css" rel="stylesheet"></head><body><noscript>You need to enable JavaScript to run this app.</noscript><div id="root"></div></body></html>
To make streamlit app running as a service, put necessary commands in a script.
sumpchart.sh
#!/bin/bash

cd /home/ec2-user/sumpchart
source /home/ec2-user/streamlitenv/bin/activate
echo "venv=$VIRTUAL_ENV"
streamlit run sumpchartapp.py
Make the script executable.
chmod +x sumpchart.sh
11. Configure SumpChart app to run as a system service
Like running the Jar app as a service, let’s set up the SumpChart Streamlit app to run as a service.
sudo su
[Unit]
Description=Sump Chart service
After=syslog.target network.target

[Service]
User=ec2-user
Group=ec2-user

Type=simple

WorkingDirectory=/home/ec2-user
ExecStart=/home/ec2-user/sumpchart.sh
KillSignal=SIGINT

[Install]
WantedBy=multi-user.target
Reload systemd, start, check status of the new service.
systemctl daemon-reload
systemctl start sumpchart.service
systemctl status sumpchart.service
# Output
● sumpchart.service - Sump Chart service
     Loaded: loaded (/etc/systemd/system/sumpchart.service; disabled; preset: disabled)
     Active: activating (start) since Sat 2024-01-27 11:20:13 EST; 48s ago
Cntrl PID: 412050 (sumpchart.sh)
      Tasks: 6 (limit: 1061)
     Memory: 69.6M
        CPU: 1.021s
     CGroup: /system.slice/sumpchart.service
             ├─412050 /bin/bash /home/ec2-user/sumpchart.sh
             └─412051 /home/ec2-user/streamlitenv/bin/python3 /home/ec2-user/streamlitenv/bin/streamlit run sumpchartapp.py

Jan 27 11:20:13 ip-172-xx-xx-xx.ec2.internal systemd[1]: Starting sumpchart.service - Sump Chart service...
Jan 27 11:20:13 ip-172-xx-xx-xx.ec2.internal sumpchart.sh[412050]: venv=/home/ec2-user/streamlitenv
Jan 27 11:20:14 ip-172-xx-xx-xx.ec2.internal sumpchart.sh[412051]: Collecting usage statistics. To deactivate, set browser.gatherUsageStats to False.
Jan 27 11:20:14 ip-172-xx-xx-xx.ec2.internal sumpchart.sh[412051]:   You can now view your Streamlit app in your browser.
Jan 27 11:20:14 ip-172-xx-xx-xx.ec2.internal sumpchart.sh[412051]:   Network URL: http://172.xx.xx.xx:8501
Jan 27 11:20:14 ip-172-xx-xx-xx.ec2.internal sumpchart.sh[412051]:   External URL: http://52.xx.xx.xx:8501
Make the service start automatically.
systemctl enable sumpchart.service
# Output
Created symlink /etc/systemd/system/multi-user.target.wants/sumpchart.service → /etc/systemd/system/sumpchart.service.
12. Configure Nginx to access applications
Now that there are 2 applications that interact with users and devices are running, they need to be allowed to access through Nginx server.
- Streamlit for visualization that is the root of the subdomain, i.e.
sumpdata.nobudev7.com/ - Java server application as a
sumpdataservice on/devicesendpoint - Along with the Java server, Swagger uses 2 endpoints,
/swagger-uiand/v3.
In configuring those endpoints, I want /devices endpoint, which is the REST API endpoint, to have limited access from my own devices. The easiest way is to limit the IP address(es) that can access to the endpoint.
/etc/nginx/conf.d/sumpdata.conf
server {
    server_name  sumpdata.nobudev7.com;

    # Streamlit
    location / {
	proxy_pass http://localhost:8501;
	proxy_redirect off;
    }

    # Streamlit WebSocket folder
    location /_stcore {
        proxy_pass http://localhost:8501/_stcore;
        proxy_http_version 1.1;
        proxy_set_header Upgrade $http_upgrade;
        proxy_set_header Connection "Upgrade";
        proxy_set_header Host $host;
    }

    # Swagger is accessed via /swagger url.
    location /swagger {
        proxy_pass http://localhost:8080/swagger-ui;
        index index.html;
        proxy_redirect off;
    }

    # This is also for Swagger that requires /v3/... url
    location /v3 {
        proxy_pass http://localhost:8080/v3;
    	proxy_redirect off;
    }

    # This is the sump data endpoint.
    location /devices {
        proxy_pass http://localhost:8080/devices;
	    proxy_redirect off;
        allow 123.xxx.xxx.xxx; # This is where the device resides
        deny all;

    }
Test the config, reload, and Nginx should be routing all endpoints correctly.
nginx -t
nginx -s reload