Building and Publishing c4002-python: A 24GHz mmWave Radar Driver for Raspberry Pi
Open Source Links
- GitHub Repository: github.com/nobudev7/c4002-python
- PyPI Package: pypi.org/project/c4002-python/
- Issue Tracker: github.com/nobudev7/c4002-python/issues
Technologies used
| Component | Technology | Role |
|---|---|---|
| Hardware | Raspberry Pi | Host controller & UART interface |
| Sensor | DFRobot C4002 (SEN0691) | 24GHz FMCW mmWave human presence radar |
| Language | Python 3.8+ | Driver, CLI utilities, and telemetry decoder |
| Packaging | Hatchling / pyproject.toml | PEP 517/621 build backend |
| CI/CD & Release | GitHub Actions + PyPI OIDC | Automated testing, linting, and Trusted Publishing |
Motivation
Traditional PIR (Passive Infrared) motion sensors are the standard choice for smart lighting and home automation, but they have a fundamental limitation: they only detect gross movement. If you sit still, a PIR sensor doesn’t report any movement.
To achieve true human presence detection, 24GHz millimeter-wave (mmWave) FMCW radar sensors work very well. They can detect micro-motions as subtle as human respiration and chest expansion up to 10 meters away.
Recently, I integrated the DFRobot C4002 (SEN0691) mmWave sensor into my Raspberry Pi home monitoring setup. However, while DFRobot provides an Arduino C++ library, there wasn’t a pip-installable Python package available for Linux and Raspberry Pi developers.
I decided to build c4002-python from the ground up, test it thoroughly on actual hardware, and publish it as an open-source package on PyPI and GitHub.
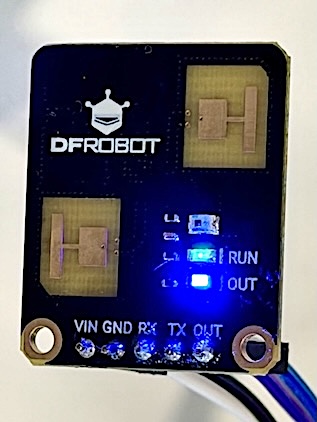
The Hardware: DFRobot C4002 (SEN0691)
The C4002 is a compact 24GHz FMCW radar module that operates between 3.6V and 5.5V with 3.3V TTL UART logic:
- Micro-Motion & Static Presence: Detects sitting, breathing, or sleeping individuals up to 10 meters.
- Motion Tracking: Measures target distance, speed, signal energy (0–100), and direction (
ApproachingvsMoving Away) up to 11 meters. - Ambient Light Sensor: Onboard photosensor rated for 0–50 Lux, useful for dusk-to-dawn lighting triggers.
- Configurable Distance Gates: 80cm or 20cm resolution gates with customizable sensitivity thresholds.
- Dual Output Modes: Standard 115200 baud UART protocol plus a digital
OUTGPIO pin.
Wiring to Raspberry Pi
Connecting the C4002 to a Raspberry Pi’s 40-pin GPIO header requires only 4 or 5 jumper wires:
  Raspberry Pi GPIO Header                  DFRobot C4002
 ┌─────────────────────────┐               ┌─────────────┐
 │ Pin 2  [5V]             ├───────────────┤ VIN         │
 │ Pin 6  [GND]            ├───────────────┤ GND         │
 │ Pin 8  [GPIO 14 / TXD]  ├───────────────┤ RX          │
 │ Pin 10 [GPIO 15 / RXD]  ├───────────────┤ TX          │
 │ Pin 11 [GPIO 17]        ├───────────────┤ OUT (opt)   │
 └─────────────────────────┘               └─────────────┘
Decoding the 32-Byte Binary UART Protocol
The C4002 continuously streams 32-byte binary notification frames at 115200 baud. The frame layout is structured as follows:
- Header (4 bytes): Fixed synchronization pattern
0xFA 0xF5 0xAA 0xA5. - Length (2 bytes, LE): Total packet length (
0x0020= 32 bytes). - Control (2 bytes): Reserved byte
0x00and message type (0x04for Notification). - Command ID (1 byte):
0x60for live detection telemetry or0x03for background noise calibration status. - Inner Payload:
- Target Status (
0 = No Target,1 = Static Presence,2 = Motion) - Ambient Light Intensity (uint16 LE, scale
0.1 Lux) - Active Distance Gate bitmask (uint32 LE)
- Presence Disappearance Countdown (uint16 LE, seconds)
- Presence Distance (uint16 LE cm) & Energy (uint8, 0–100)
- Motion Distance (uint16 LE cm), Speed (signed int16 LE cm/s), Energy, and Direction
- Target Status (
- Checksum (2 bytes, LE): 16-bit sum of all preceding bytes (
sum(bytes[:-2]) & 0xFFFF).
Real-World Engineering Challenges
Building a production-ready driver required solving several practical hardware quirks:
1. Zero-Lag Hardware Synchronization
While using time.sleep() between reads was convenient at the beginning, it introduced serial buffer lag because the sensor streams telemetry continuously. For efficiency and real-time responsiveness, read_packet() blocks directly on the incoming UART stream until the next validated frame arrives:
# Paced directly by the sensor hardware clock
data = sensor.read_packet()
Letting the hardware clock pace the read loop eliminates buffer backlog and keeps CPU usage near zero.
2. Dark / Stealth Mode (Turning Off Onboard LEDs)
The C4002 module features two bright onboard LEDs: a blue RUN status LED and an OUT detection indicator. In a bedroom or office, the bright blue LED can be distracting.
By analyzing the module’s protocol command CMD_SET_LED_MODE = 0xA1, I implemented software-controllable LED states:
# Stealth mode: completely turn off both LEDs over UART
sensor.turn_off_leds()

# Or toggle them individually
sensor.set_run_led(False)
sensor.set_out_led(False)
Both example scripts also expose CLI flags (--led-off and --led-on) for instant toggling.
3. Automatic Background Noise Calibration
High-frequency 24GHz radar waves reflect off stationary room objects (metal cabinets, ceiling fans, moving curtains). The sensor includes a built-in background noise learning routine (CMD_ENV_CALIBRATION = 0x60). The library exposes:
sensor.start_env_calibration(delay_time=10, cont_time=30)
This gives you 10 seconds to exit the room, after which the sensor samples background reflections for 30 seconds and writes custom noise thresholds to prevent false triggers.
4. 1-Minute Windowed Time-Series Aggregation
Checking presence every 60 seconds directly risks missing transient events (e.g., someone walking through a room for 15 seconds). I added a windowed aggregator (examples/minute_aggregator.py) that continuously monitors the sensor at 1 Hz and exports 1-minute summaries (occupancy_pct, avg_distance_m, max_motion_energy, avg_light_lux) into CSV format, ready for Grafana or home dashboard charting.
Packaging and CI/CD Pipeline
To ensure the library is reliable and maintainable, I set up modern Python packaging and automation standards:
1. Modern Build System with pyproject.toml
Instead of legacy setup.py, the package uses PEP 517/621 with Hatchling:
- Strict metadata and type hints.
- Optional Raspberry Pi GPIO support via extra:
pip install "c4002-python[gpio]". - Fast linting with Ruff configured to Python 3.8+ targets.
2. Multi-Version Testing on GitHub Actions
A GitHub Actions test workflow runs on every push and pull request, executing test suites across Python 3.8, 3.9, 3.10, 3.11, and 3.12 on Ubuntu runners using captured live sensor packet fixtures.
3. Publishing to PyPI via Trusted Publishers (OIDC)
Instead of storing permanent PyPI API tokens in GitHub repository secrets, c4002-python uses PyPI’s Trusted Publisher mechanism.
When a new version tag (e.g. v0.2.0) is published on GitHub, GitHub Actions generates an OpenID Connect (OIDC) cryptographic token. PyPI verifies the token directly against the repository identity (nobudev7/c4002-python) and workflow (publish.yml), building and publishing the source distribution (.tar.gz) and wheel (.whl) without any manual secrets.
Getting Started
Installation
Install directly from PyPI:
# Standard installation
pip install c4002-python

# With Raspberry Pi GPIO OUT pin support
pip install "c4002-python[gpio]"
Quick Example
from c4002 import C4002Sensor

# Connect to Raspberry Pi hardware UART (/dev/serial0)
with C4002Sensor(port="/dev/serial0") as sensor:
    # Optional: disable onboard LEDs for dark environments
    sensor.turn_off_leds()

    print("Monitoring presence. Press Ctrl+C to stop...")
    while True:
        data = sensor.read_packet()
        if data and not getattr(data, "is_calibrating", False):
            print(f"State: {data.target_state_name} | Light: {data.ambient_light_lux} Lux")
            if data.presence_detected:
                print(f"  Presence Distance : {data.presence_distance_m} m (Energy: {data.presence_energy}/100)")
                if data.motion_distance_m > 0:
                    print(f"  Motion Tracking   : {data.motion_distance_m} m at {data.motion_speed_m_s} m/s ({data.motion_direction_name})")
If you’re building a Raspberry Pi presence detection project, give it a spin and feel free to open an issue or pull request!
Enjoy Reading This Article?
Here are some more articles you might like to read next:
- PiLambdaChart: Building a Serverless IoT Dashboard with Raspberry Pi and AWS
- AWS Lightsail Java Server Setup Memo
- Using an IR Sensor for Precise Distance Measurement on Raspberry Pi
- Setting up Raspberry Pi with an Ultrasonic Sensor
- Migrating To Serverless: Raspberry Pi To Dynamodb Plus Lambda Function For Chart Generation